So far we have:
- Had a user land the portlet and opened a new session for them.
- Assigned their Session Token to their PortletSession.
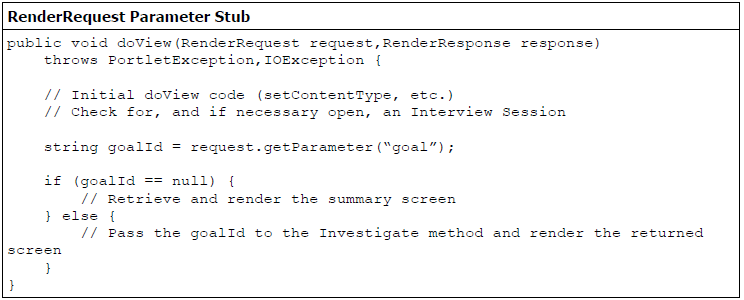
- Established that as there is no interview in progress, the Summary screen should be displayed.
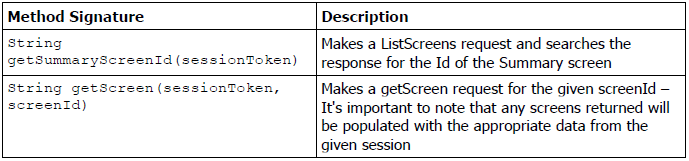
- Searched the list of screens in the rulebase and established the id of the Summary screen.
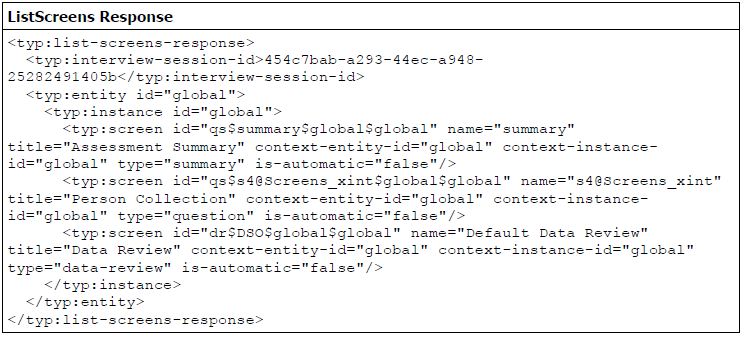
- Requested and had returned, a definition of that Summary screen.
- Attached the returned screen definition to the RenderRequest.
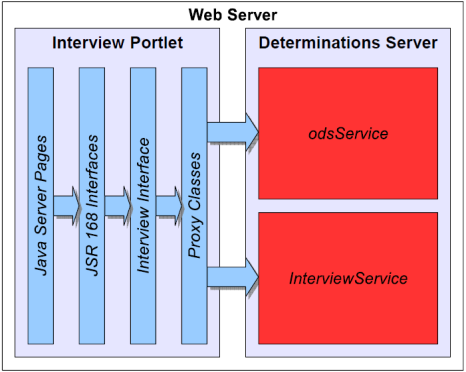
Up to this point, the focus has mainly been on the in's and out's of working with the Interview Service and associated proxy classes, pausing only briefly to set-up a basic JSR 168 Portlet. In the last section though, the Summary Screen for the rulebase was retrieved, so it now needs to be rendered to the user. The last stage therefore, is parsing this Screen Definition in JSP to produce the desired HTML, XHTML, WML, and so on.
Interview Screens themselves are potentially very complex structures, containing not only 15 different Control types but errors, warnings, property and potentially commentary as well. For the simple interview portlet though, we are only interested in a small subset of those controls, with discussion of the remaining controls in the Advanced Implementation Considerations section.
All controls inherit from a base control type known as the ControlBase, and as such have a set of consistent attributes; of interest to our Simple Portlet are:
- is-visible – this needs to be checked on every control to decide whether or not it is rendered to the user. Where this is false, the control shouldn't be included in the screen.
- caption – particularly important for items such as goal-controls, which link off to other pages; this is the caption that should be displayed with the control.
- is-html – defines whether or not the contents of the control should be rendered as HTML. Generally only used on label-controls, it is nevertheless still important to check this so a decision can be made as to whether the contents should be escaped before rendering.
- css-class – the class that should be assigned to the element containing this control, for styling by CSS.
Given the above list of Attributes, the following is a list of controls that our Simple Portlet will be capable of rendering:
- label-control – a simple extension of the Base Control type, designed for displaying text, and potentially HTML to the user.
- goal-control – restricted to the Summary screen, goal-controls extend the base control to include not only the identifier of one of the goals available for investigation in the rulebase, but also potentially their value if they have been investigated (this can potentially be unknown or uncertain).
- boolean-control, text-control, number-control – a subset of the seven different attribute controls that have been chosen for our simple portlet. These allow the user not only to input the values of the associated attributes, providing the attribute Id and question text, but also potentially provide us with a value to pre-populate into the input control (potentially either a default or previously entered value).
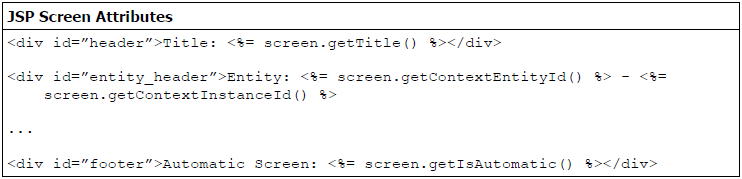
We now have a list of elements to look for in the screen definition, and since that has been attached to the RenderRequest it is also possible to access that definition in the JSP page. The Summary screen in the example that was retrieved in the last section contains both label and goal controls, so it is important that the dispatched JSP page is able to handle both.

The JSP Skeleton shown above is simply the start of a JSP page, including the appropriate import and taglib statements to give access to the portlet tags. One of these portlet tags is <portlet:defineObjects/>, which establishes three objects for use in portlet JSP pages; renderRequest, renderResponse and portletConfig. You can see use of one of these objects, the renderRequest, at the end of the JSP stub above, where we pull the screen definition out of the renderRequest attributes.
With that screen definition now in scope and available to be used in the JSP page, all that is left to do is to pull out any required screen attributes:
and loop through the list of controls attached to the screen:
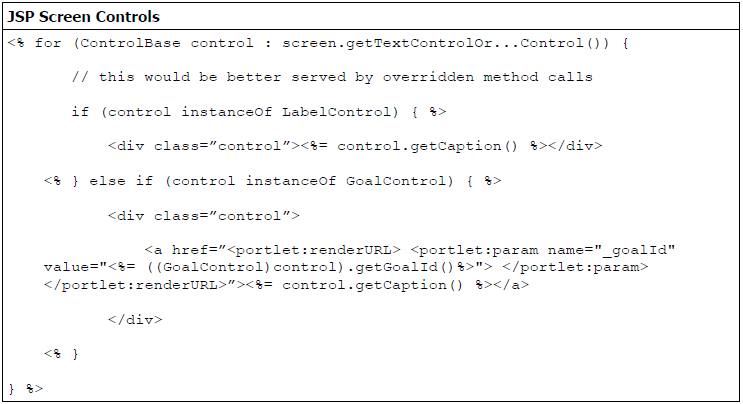
By bringing scriptlets into the mix, it is possible to effectively loop through the Control list, checking the type of each control before applying a suitable rendering method. In the above code stub you can also see that we've used the portlet:renderURL tag to create a URL with which to start our interview. At present, clicking that link will merely result in the same screen being displayed again, since our doView or doDispatch methods have no logic to deal with the presence of a goal parameter. In the next section we'll look at what we need to add in order to go through an interview in our portlet.